INTRODUCTION
We browse websites, take and store notes, check mails and in the process, enter personal information and forget about it. This information may include passwords, credit card numbers, social security numbers, bank account number information and other such personal details that get accumulated at various places on your PC, from web forms to email. It is not difficult for someone with mal intentions to access this information and this makes almost 1 out of every 5 PC users a victim of Identity Theft.
ADVANCED IDENTITY PROTECTOR
search for this information and displays it to you. You can choose to perform any of the action from deleting the traces permanently, moving them to Secure Vault or put them in Exclusion list. These actions will wipe out the traces from the system and will reduce the risk of identity theft..
ADVANCED IDENTITY PROTECTOR
also provides the facility to store the personal information in password protected Secure vault. Information stored in Secure vault is saved in encrypted format.
In this modern world, things are getting more and more innovative and user friendly. While we all try our best to do our job with full attention and clear mind, somehow, we miss or leave a clue to our identity somewhere as we move on. Some intruders get access to the places where valuable information is available using latest techniques and make people lose their valuable assets and create problems for them. Internet browsing records your activities without your knowledge. This unauthorized intrusion can also scan files and folders along with mails – some of them may be highly secretive. That may affect your personal identity and financial security. It is apparent that our digital identities play an increasingly significant role in our lives, so we need to protect them as much as we can. The measures of security and privacy are becoming a more integral part of every online service.
ADVANCED IDENTITY PROTECTOR
lets you enter your valuable information which will be saved in encrypted format in the Secure Vault. You can save your Social Security Number, Bank Account Number, Password, Credit Card Number or any other information. When scanning will be done this information will be searched on your PC in the areas selected by you. If information is found then it will be displayed to you and you can either delete it permanently, or move it to Secure Vault, or can exclude it from future scans.
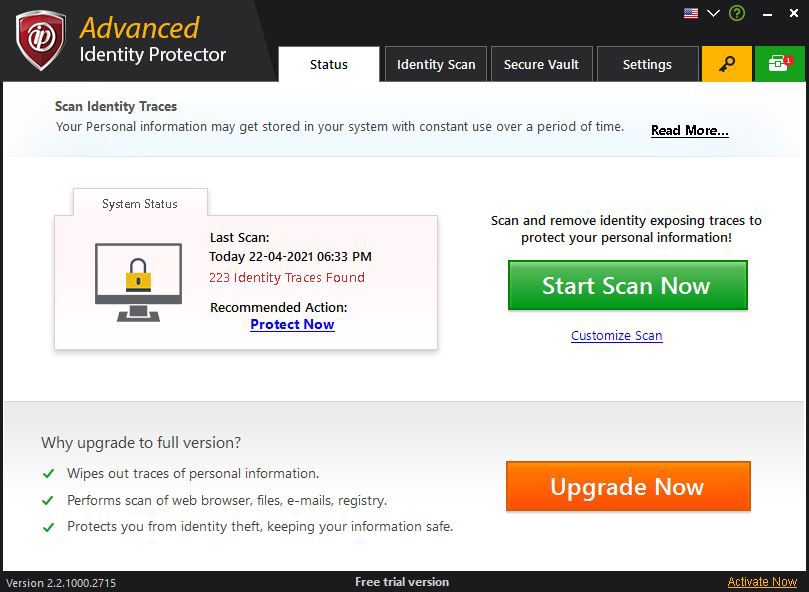
Scanning for Identity Traces
Once you’ve installed Advanced Identity Protector all you need to do is scan for hidden identity traces on your computer. To begin, click on “Start Scan Now” and the software will progressively look for any stored contact, personal or financial information on your computer.
Register for Full Version
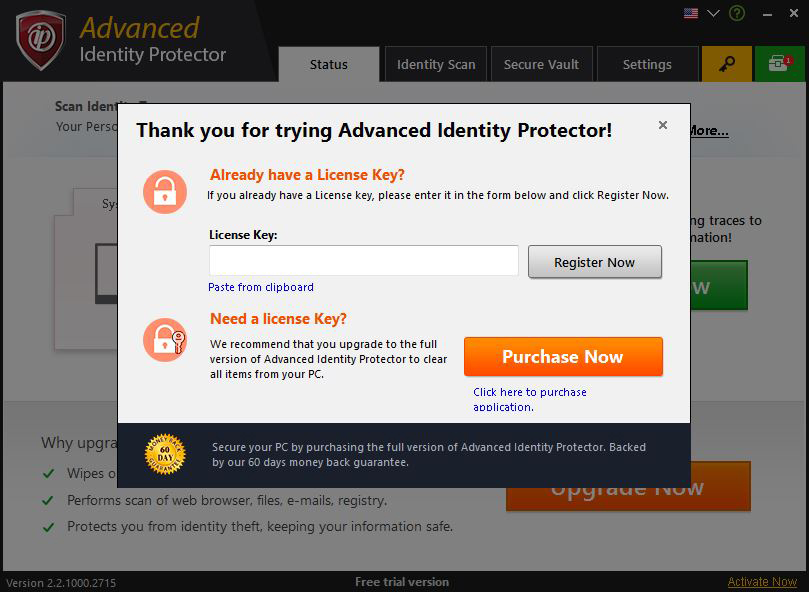
Select this option to register the ADVANCED IDENTITY PROTECTOR by entering the serial key that you purchased. This screen can also be opened by clicking on ‘Register Now’ button. Only registered software can secure your PC and give complete protection.
Check for Updates
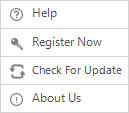
Select this option to check and download new version of the software. It also checks if additional plugins are available.
About Us
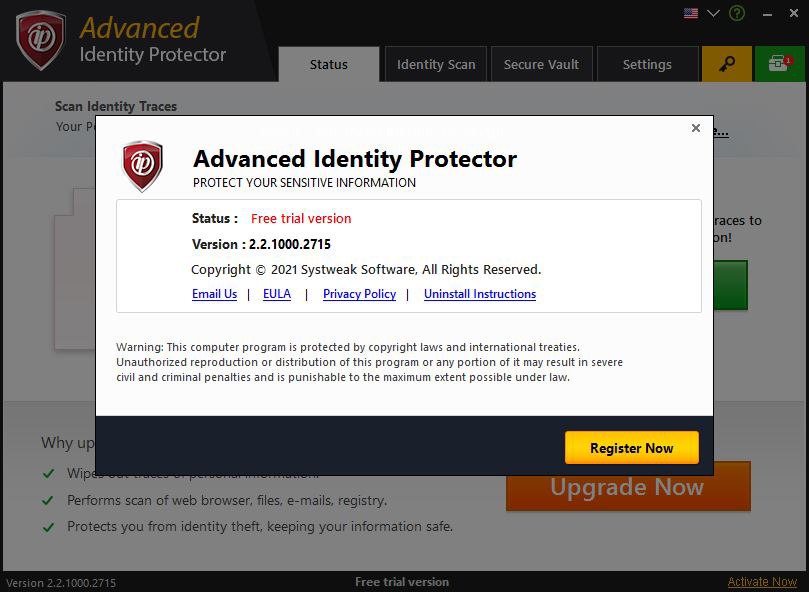
Select this option to display the about screen. About screen shows the copyright information and the license status of the software.
Copyright © 2018 Systweak Software. All rights reserved.
System Requirements
Microsoft Windows 10, 8.1, 8, 7, Vista and XP.
.Net Framework 3.5.
Graphics mode 800×600 with 32/24 bit colors
FEATURES
Find vulnerable identity traces
We browse websites, take and store notes, check mails and in the process, enter personal information and forget about it. This information may include passwords, credit card numbers, social security numbers, bank account numbers and other such personal details that get accumulated at various places on your PC, in files, emails etc. It is not difficult for someone with mal intentions to access this information. ‘ADVANCED IDENTITY PROTECTOR’ searches for these traces and displays them to you.
Protection from identity theft
‘ADVANCED IDENTITY PROTECTOR’ displays the identity traces found on your system. You can delete the traces permanently, or lock them in your Secure Vault for better security. These actions will wipe out the identity traces from your system so you will be safe from the risk of identity theft.
Securely store personal information
You can store your personal information in Secure vault. The information is stored in the encrypted format. Secure vault is protected by password so nobody can access the information unless he has the password set by you.
Schedule the scan
Scanning for identity traces is periodically recommended. Scheduler facilitates to schedule the scans as per user’s convenience. The scan starts automatically at the specified time.
Exclude selected identity traces
You can exclude selected identity traces from scanning that you find safe. Identity traces once excluded will not be displayed in the scan result and the result will contain only the identity traces that are important to you.
Exclude selected folders
You may want to exclude some folders from scanning. Those folders can be added to excluded folder list. Folders in excluded folders list will not be scanned for identity traces.
Automatically Move Confidential Information to Vault
Sometimes you want to keep the detected identity traces but also want that nobody can access it. ‘ADVANCED IDENTITY PROTECTOR’ has the option of automatically adding identity traces to Secure vault when one of the action from Delete, Move to Secure Vault or Exclude is performed. So, on one hand it will wipe identity traces on your system while simultaneously moving them to Secure vault. Secure vault is protected with password and information is stored in encrypted format so nobody will be able to access that information without your permission.
SCAN AREAS
Scan Areas are the areas from where ADVANCED IDENTITY PROTECTOR identifies the traces of information saved on your machine which you are not aware of.
Select scan areas
Here you have two options to choose from:
1. Use Default Scan Settings (Recommended)
This option is recommended for most of the users as it covers all potential areas. When user will click start scan button it will start scanning for identity traces with predefined settings.
2. Select area for search
If the user selects this option then he can choose areas which are to be included in search for identity traces. Scan area is divided in three sections:
Browsers
Internet Explorer, Firefox, Chrome and Opera are included in this area. If Firefox and/or Chrome and/or Opera is installed then the respective checkboxes will be automatically enabled, otherwise these will be disabled. A user can choose which browser to scan by checking the respective checkboxes.
Mail Clients
Microsoft Outlook, Outlook Express are included in this area. If Microsoft Outlook is installed then the respective checkboxes for Microsoft Outlook will be enabled otherwise these will be disabled. A user can choose which mail client to scan by checking the respective checkboxes and can also specify whether he wants to search in the attachments of these mail clients.
Locations
File System and Registry are included in this area. A user can choose whether he wants to include file system and/or registry in the scan by checking the respective checkboxes.
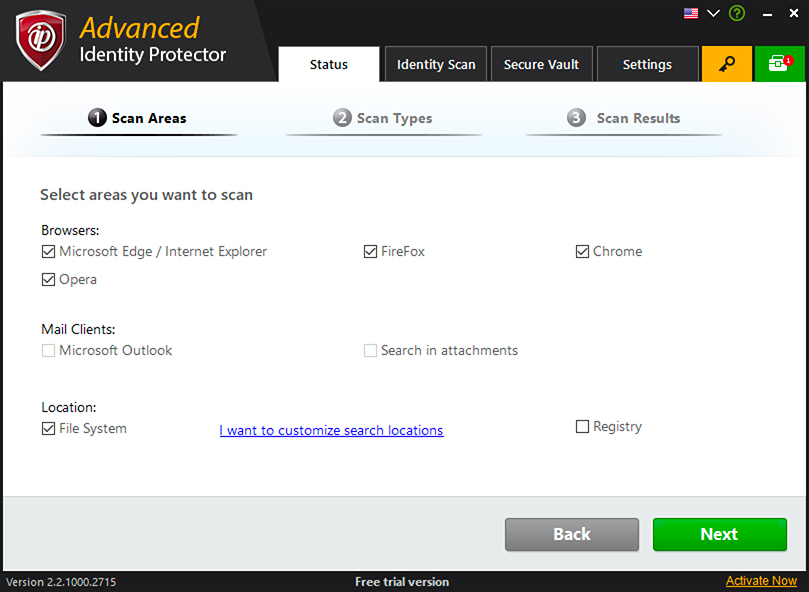
The user can specify which location to include in search by clicking on ‘I want to customize search locations’. After clicking on this ‘custom folder selection’ screen will appear where the user can choose which folders to scan. By default, ‘user profile’ is included in scan. To include more folders in searching select the folder from the tree on the left and click on arrow. Selected folders will appear in the list on the right. To remove folder from the list, select the folder and click on ‘Remove’ button.
Select Identity area for search
User can also specify which type of files to include in search. He can choose from one of two options:
Search in Common file types
If user select this option then text, word, rtf, excel and pdf files are included in search.
Search in all file
If this option is selected then all file types are included in search.
SCAN TYPES
Scan Type refers to the type of information you want to look for. This could include contact information, credit card information, personal and professional details and other important documents.
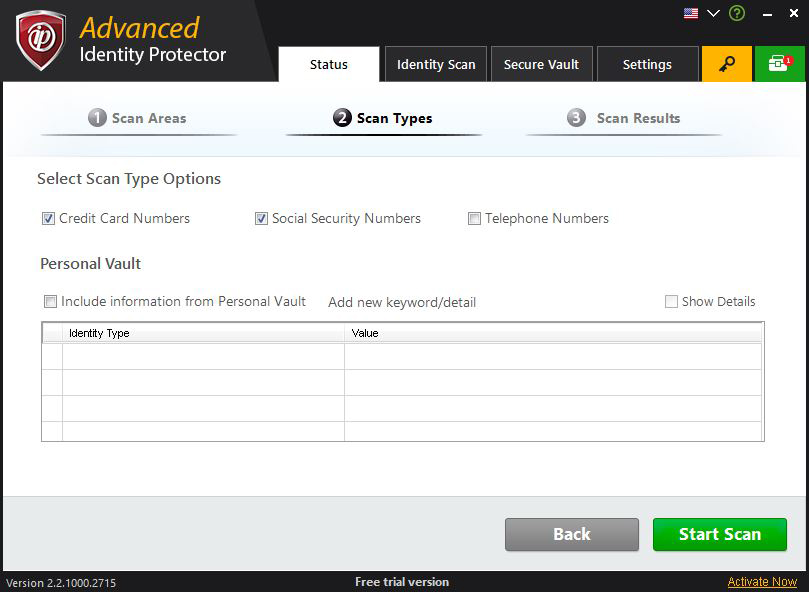
Select Options for search
To search Credit Card Numbers, Social Security Numbers, Telephone Numbers check the respective checkboxes.
Scan Special Keywords
You can also use keywords from stored information in the vault during scan so they can be easily detected. Any information such as Credit Card, Social Security, Bank Account Information and contact info in Secure Vault can be used as Special Keywords for ad more accurate scan result.
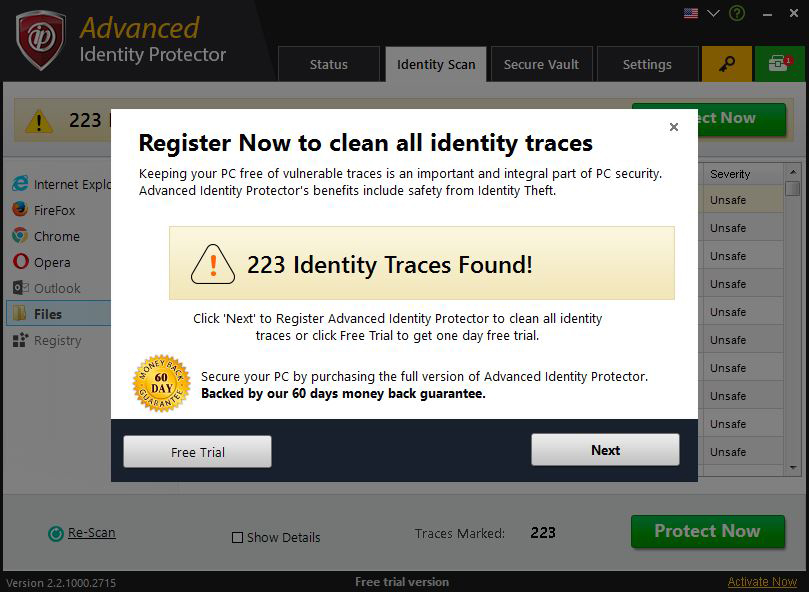
SCAN RESULTS
On completion of scanning process, scan result screen will appear. It will show the identity traces found in selected areas.
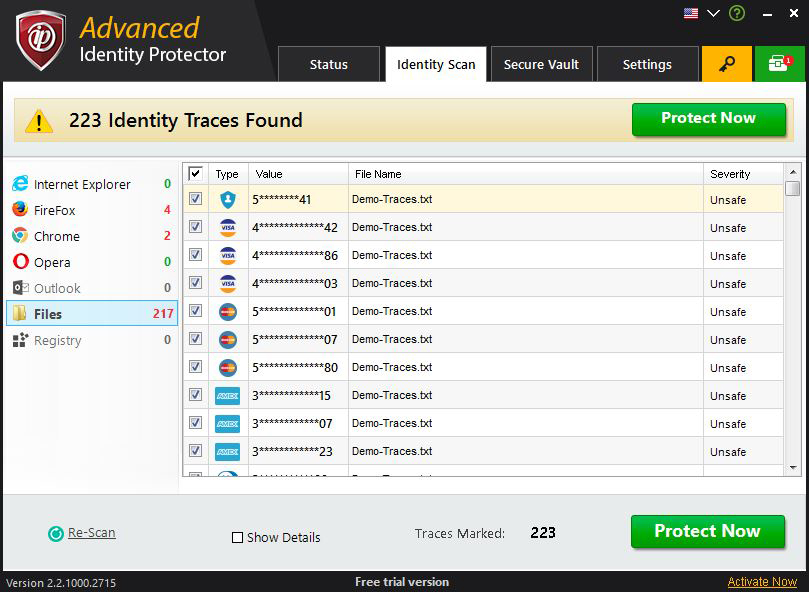
After the scan is performed, all results are displayed on Identity Scan tab under various categories displayed on the left panel. All results will be checked by default and can be unchecked by directly clicking on the box in the first row. Once you’ve made your selection, just click ‘Protect Now’ and choose from the 3 following options.
Move to Secure Vault (Recommended)
Performing this action, all detected traces of your identity are encrypted and moved to Secure Vault and are permanently deleted from your system. This means they will only be viewable by you upon entering your Secure Vault password.
Remove Traces Permanently
Choosing this option will permanently delete any identity traces detected by the software. These traces will be safely deleted from your system meaning they cannot be recovered by anyone.
Add to Exclusion List
In exclude process, identity traces are excluded from the scanning and will not appear again until you remove the identity traces from the exclusion list. Identity traces excluded in one section will be excluded in all sections. It is safe to exclude the identity trace when you find that keeping it will not risk the danger of identity theft.
Once you’re done, clicking on finish button will bring you to the welcome screen.
SETTINGS
Schedule
Here you can schedule the ADVANCED IDENTITY PROTECTOR to scan for identity traces at a time.
Select type of schedule
Here you have the following options:
Recommended
Selecting this option and clicking on apply button will create a default schedule that will take place during that time every day.
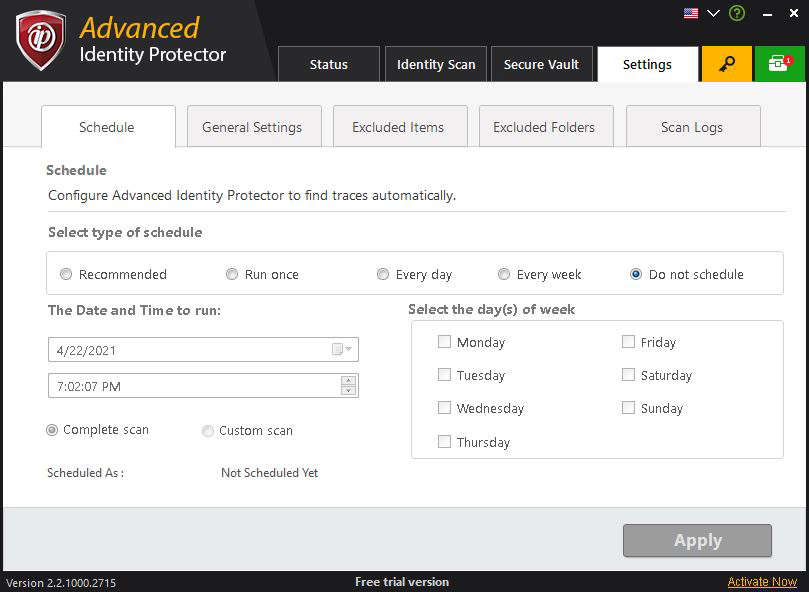
Run once
If you select this option then the schedule will run only once. You can specify the date and time when the schedule will run.
Every Day
If you select this option then the schedule will run daily. You can specify the time at which this schedule will run daily.
Every Week
To run the schedule every week, select ‘Every week’ option. You can specify the time and one or more days in week on which this schedule will run.
Do not schedule
Selecting this option and clicking on apply button will delete the schedule of ADVANCED IDENTITY PROTECTOR. Schedule scan can be either complete scan or custom scan. Select the type of schedule that you want to schedule.
General Settings
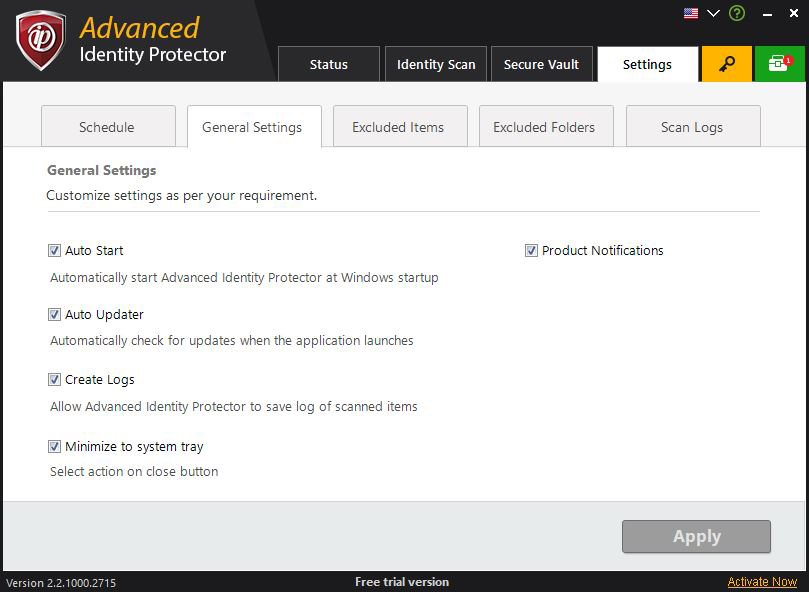
Here you can customize various settings for Advanced Identity Protector as per your preferences.
Auto Start
Checking this box will launch Advanced Identity Protector alongside system startup. You can uncheck this box if you do not want this software to be launched when your system starts.
Auto Updater
Checking this box will automatically look for latest updates as soon as you launch Advanced Identity Protector. If you wish to search for updates manually (not recommended), uncheck this option.
Create Logs
With this option selected, Advanced Identity Protector will automatically create and save log reports for each time you scan your system. Furthermore, you can also export these logs and delete them to keep sensitive information off your system.
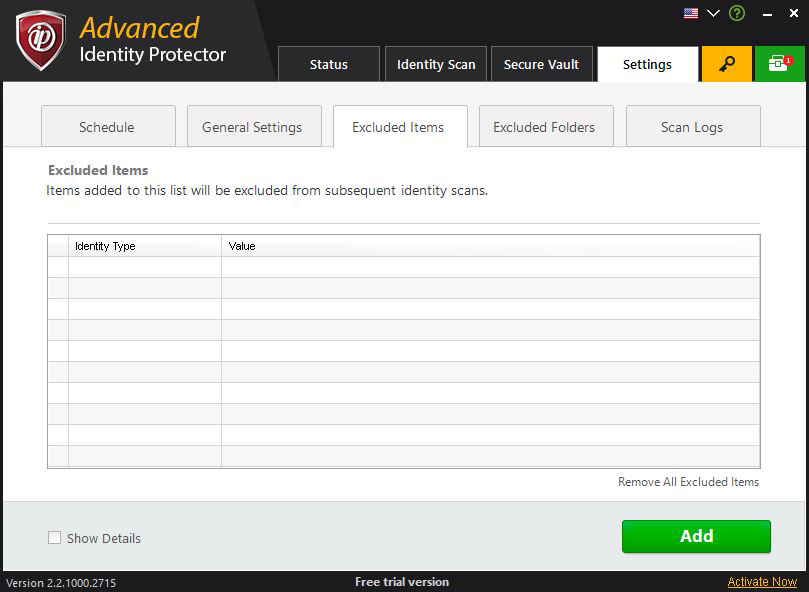
Excluded Item
This contains the list of identity traces that are excluded and will not be displayed in the scan result. The values are initially replaced with ‘*’ by default. To view the actual value, check the ‘Show Details’ checkbox. To add new identity traces to exclusion list, click on ‘Add’ button. Select the type of identity and then enter its value. ‘Remove All Excluded Items’ will remove all the identity traces from the exclusion list. To remove individual identity trace, click on the button against that identity trace.
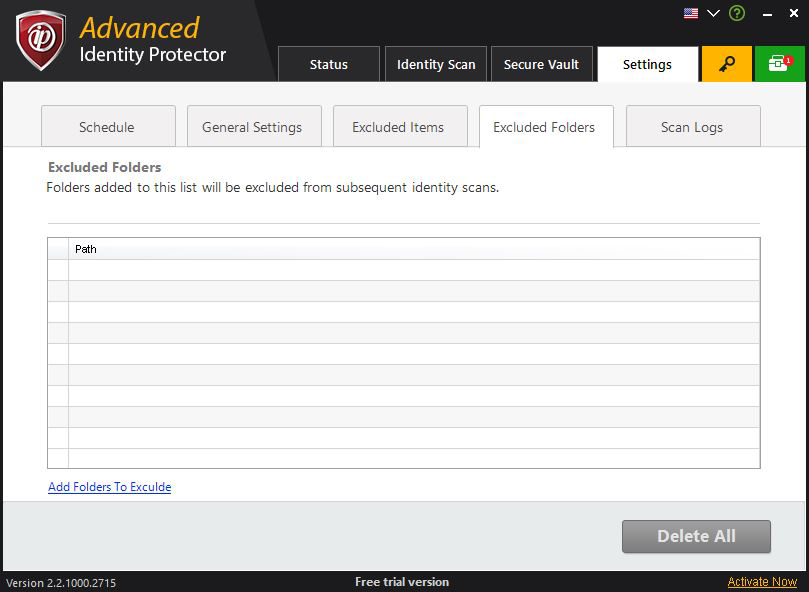
Excluded Folder
This contains the list of folders that are excluded from the scanning and will not be scanned. To add folders to excluded folders list click on ‘Add folder to exclude’. This will open the folder selection dialog box where you can select the folders to exclude from searching. ‘Delete All’ will remove all the folders from the excluded folders list. To remove individual folder, click on the button against that folder.
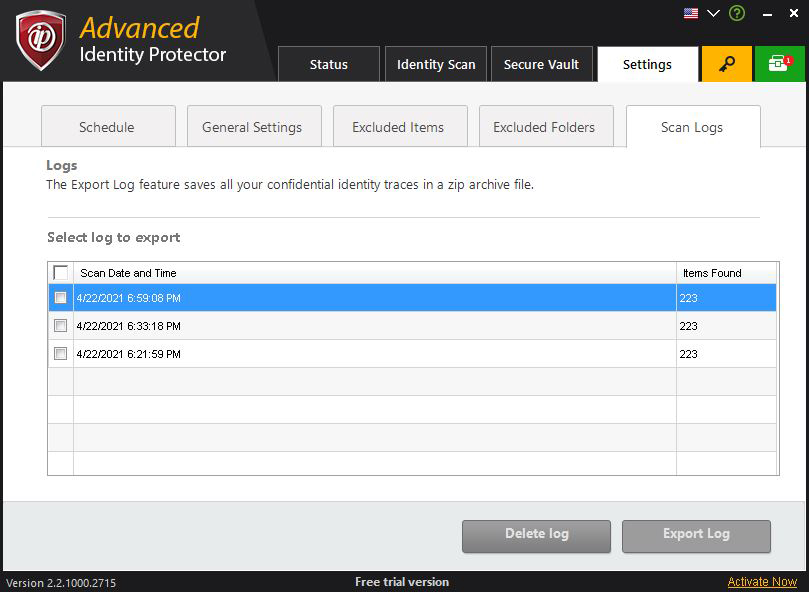
Scan Logs
It contains logs of the last 10 scans performed in Advanced Identity Protector. Users can select and delete logs by clicking ‘Delete’ button on the screen. You can also export selected logs by clicking ‘Export’ log. Logs will be exported in the form of a password protected zipped folder. Users will be asked to set the password for the zip file before saving. However, you must be a registered user to use this functionality. Additionally, while exporting logs, the app will ask user for the Secure Vault password. Users can export logs after providing the password.
FREQUENTLY ASKED QUESTIONS
Why should you use Advanced Identity Protector?
We browse websites, take and store notes, communicate using mails and in the process, enter personal information and forget about it. This information may include passwords, credit card numbers, social security numbers, bank account numbers and other such personal details that gets accumulated at various places on your PC, in files, emails etc. It is not difficult for someone with mal intentions to access this information.
What Advanced Identity Protector does?
Advanced Identity Protector scans the PC for the identity traces left on the PC. If it finds any of the traces it displays to the user. User then have the option to perform any of the action from delete, move to Secure Vault. Performing any of the three actions wipe out the traces from the PC. This reduces the risk of identity theft and storing them in Secure Vault provides easy access with robust security.
What is Secure Vault?
Secure vault is a digital locker that encrypts and stores your identity traces and any sensitive personal information. All this information will be locked with a password that only you would know.
How to Use Secure Vault?
Once you’ve scanned for the identity traces, you can protect them in Secure Vault by clicking ‘Protect Now’. Then, you will see another window where you can select the option ‘Move to Secure Vault’. It will then remove the information from your computer and save it to the Secure Vault. The app will ask you to close any web browsers. Click ‘Yes’ to close the browser directly from the app. After your files are moved to Secure Vault, click ‘Finish’.
How Can I Access Secret Vault?
Secure vault is only accessible to registered users. To do that, go to ‘Register Now’ tab and enter the license key in field provided. In case, you don’t have a license key, click Purchase Now button to get the license key. Once you enter the license key, the application will restart automatically and you can create your Secure Vault account.
Click on Secure Vault tab to create Secure Vault profile. Enter a name for your profile followed by your email address. The email address will be used to retrieve your password in case you lose it. On the next screen, set your preferred password and click ‘Next’.
How Can We Store Sensitive Information in Secure Vault?
Once you have access to Secure Vault, you can save various sensitive information such as passwords, social security number, bank details, contact details, address, personal information like date of birth or mother’s maiden name etc. in Secure Vault. To add any information, click the ‘Add’ button on the screen. A screen will pop up that will ask you to choose the type of information from the drop-down list and enter your information in the ‘Keywords’ field. Fill in the information and click ‘Add’ button. All this added information will be used when you perform a scan for Identity Traces to detect if any such information is lying unprotected on your system.